You may have always wanted to be able to play the hymns on the piano. With a little bit of knowledge and practice, anyone can play hymns on the piano. This step-by-step guide is all you need to know to teach yourself how to play the hymns.
Teach Yourself How to Play Hymns on the Piano in 7 Steps:
- Familiarize yourself with the piano
- Learn the basics of sheet music
- Learn the right hand notes: treble clef
- Learn left hand basic chords
- Learn note rhythms: eighth, quarter, half, dotted half & whole
- Learn key signatures: C, G, D, F, & Bb
- Practice and play!
If this list overwhelms you, don’t worry. It isn’t as bad as it looks! You will be surprised by how knowing just a few key things can bring about the results you are looking for before too long.
Let me interject and say one quick thing here before we dive into this:
Combining all that I have learned in teaching piano on and off for the past 17 years, I have created my very own, all virtual Learn with Pianotels program that is proving to be phenomenal for students. With a self-paced step-by-step course, the latest technology, and video chats available at any time, students are not only having a blast learning piano, they are also learning piano 8-10x faster than traditional lessons. Learn with Pianotels includes learning hymns!
I can’t be more excited about this program and the results I am seeing.
Just because it is tailored for kids, don’t let that hold you back from trying it out yourself. Adults have benefited just as much from kids in this course! So even though it is advertised for kids, give it a go. Learn with Pianotels is affordable for the whole family!
What you need to get started.
- Before we begin, let’s make sure you have all that you need to get started. You will need a piano. Preferably some type of piano that has at least 37 full-sized keys. (Find out more about my favorite piano that won’t break the budget here.)
- You will need Hymns Made Easy to start out with. This is a simplified version of the hymns. I like this version because it is seriously the best simplified hymnbook I have found out there and you can find it online for free. Not to mention it has all my personal favorite hymns.
- Print flashcards for treble clef from theperfectstartforpiano.com
- Print flashcards for basic chords
- Print flashcards for rhythm notes from theperfectstartforpiano.com
I did do a step-by-step tutorial for the hymn, I Need Thee Every Hour, if you would like to start learning that particular song.
Step #1: Familiarize yourself with the piano
Sit down at the piano and let’s explore! Ask yourself these questions:
- What do you notice about the keyboard? (black and white keys)
- What do you notice about the black keys? (they are in groups of two and groups of three)
- Play the keys and figure out which way makes the sound go up. (Right)
- Which way makes the sound go down? (Left)
- What happens when you push the pedals? (Left pedal – softens the sound, right pedal sustains the sound)
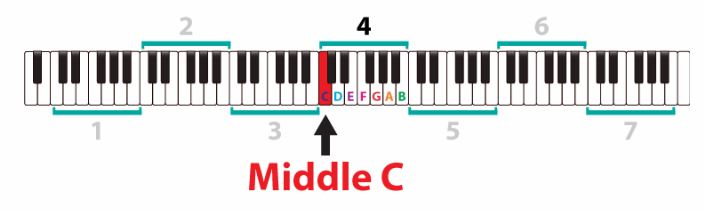
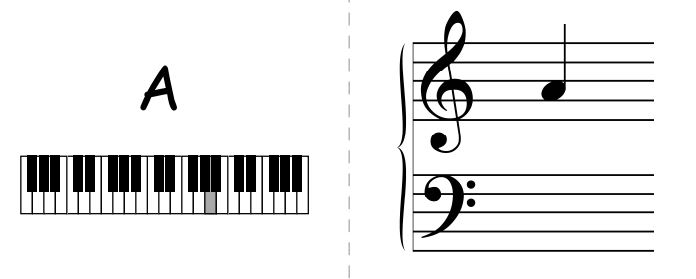
We are going to look at the keyboard in groups. Seeing the piano in groups, we can look at the keyboard and be able to identify middle c (photo courtesy of piano-music-theory.com, for additional info from that site, including how to find middle c on a smaller keyboard, click here).
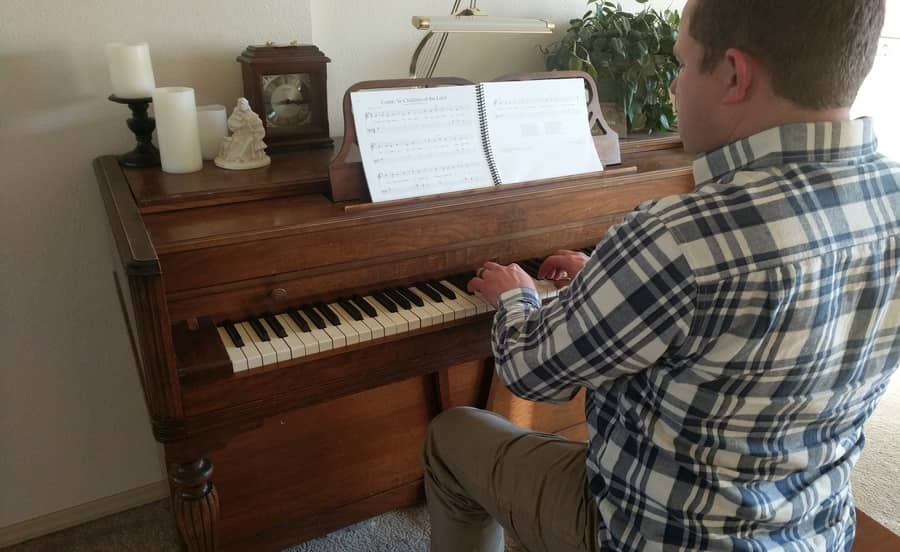
Let’s talk about the optimal way to sit at the piano.
- Sit on the bench with your hands in a fist and extend them to the back of the keys until your arms can straighten.
- Keep your knees at a 90 degree angle to the ground.
- Relax your shoulders and place your hands in a rounded position around the middle of the keyboard.

Step #2: Learn the basics of sheet music
Open up your Hymns Made Easy to page 84 “I Am a Child of God”. Study the following picture and see if you can find these things on your copy of “I Am a Child of God”.
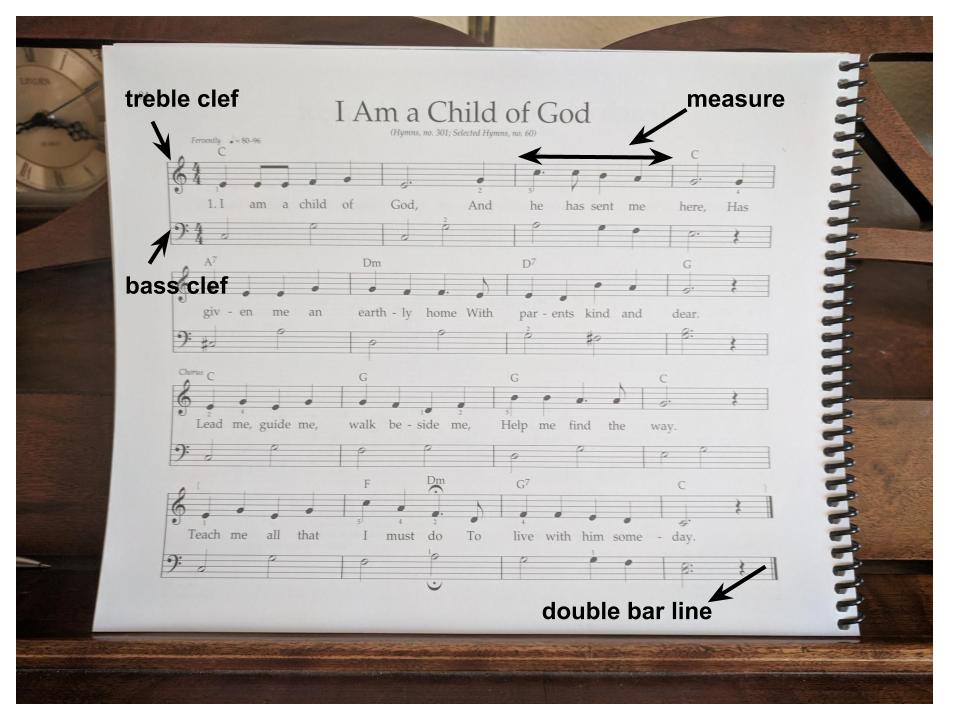
Treble clef: played by the right hand
Bass clef: played by the left hand
Measure: the area in between two bar lines
Double bar line: signifies the end of the song
When you look at your music, it is like a map to show you what and where to play on the piano keyboard. We will follow the map to figure out how to play this song!
Step #3: Learn the right hand notes (treble clef) and begin playing!
Take out your printed treble clef flashcards (click here if you still need to do that). Let’s take a look at what the flash cards mean. I like these flashcards because it shows you everything you need to know about each note: the name, where it lives on the piano, and where it lives on the keyboard. You will need to know all three of those things for each flashcard you have!
Let’s take a look at one flashcard in particular first. Pull out E.
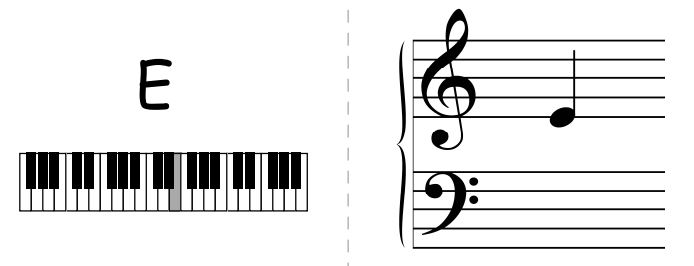
Take a good look at E. Notice that E lives on the bottom line of the treble clef. Memorize where it lives on the piano. Close your eyes and describe it out loud. (It is a white key that lives to the right of a group of 2 black keys in the middle of the piano.) Once you really feel like you have this one down, now pull out D and F.
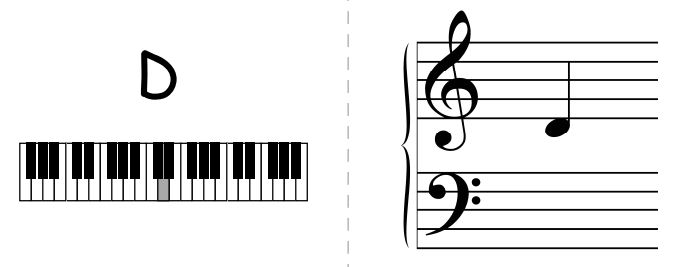
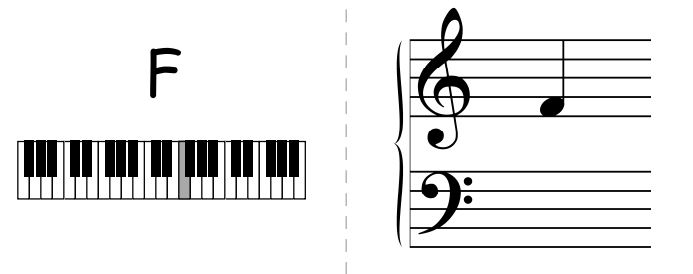
Notice how D and F live one “step” away from E on both the piano and on the staff. (Note: a staff is a When you play D, think of it being one step away from E. The same with F.
Can you do the same with C?
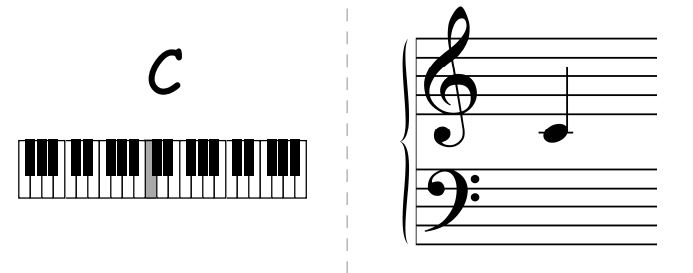
Notice how it is 2 steps away from E — or let’s call it a “skip” from E.
Take a look at G.
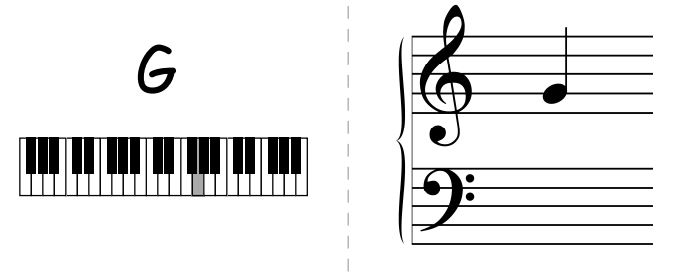
It is also a skip from E. Just a skip up from E.
When you put the keys in order like so: C, D, E, F, and G, you can see how they are all relative to E.
Looking at piano in this way of relativity will simplify your learning. Eventually you will know all the notes because you just do, but for now you can think of them as relative from each other. When you begin to play the music, play each note based off of another.
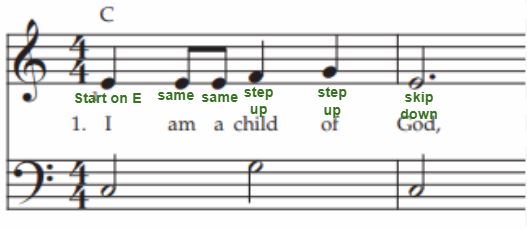
Let’s put that into practice! Let’s get ready to play the first phrase of “I Am a Child of God” with just the right hand. Start with E — the note you know best! What happens next? Same, same, step up, another step up, skip down.
Can you play it on the piano? Did you just play the piano? Congratulations! You did it! I am not exaggerating when I say that you just did what most of the world cannot. You just read and played the piano!
If you didn’t quite get it, line up your flashcards in the order in the song (E played 3 times, then F, then G, then back to E).
I want you to play the song one more time, but this time, let’s make sure you play it with the proper hand position. Your hand position should be like you are putting your hand over a bubble. Rounded fingers and and raised wrist. We are going to number your fingers as follows:
(Image from lessonsinyourhome.net — visit for more info on finger numbers.)
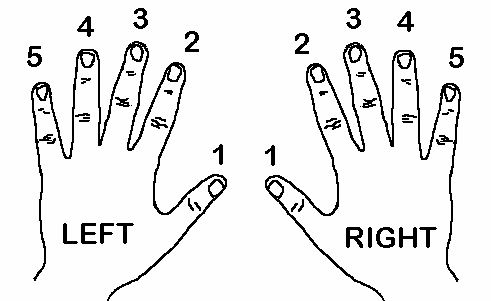
When you see a little number next to a note on the music, try to play with that finger. The fingering is designed to use the optimal hand position to allow all your fingers to play. In this song, you will begin the finger #1 on E. Then play the next note F with finger #2. Play G with finger #3. Then back to finger #1 with E.
From now on, when you play the song, do your best to follow the fingering and when fingering isn’t labeled, then do what makes most sense to optimally use your fingers into a comfortable position without it being too awkward.
There are only a few more notes to become familiar with. We will follow the pattern we learned previously, but this time making B our note to begin with.
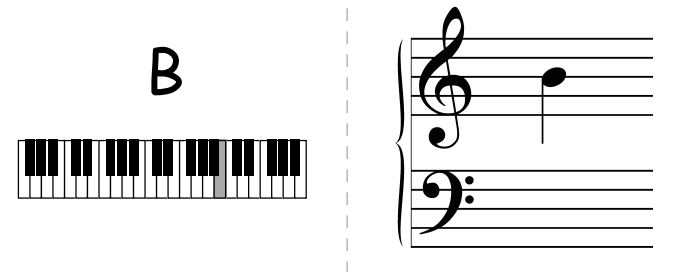
Notice how B is the middle line of the treble clef. Memorize where it lives on the piano. Close your eyes and describe it out loud. (It lives to the right of a group of black keys.)
Now you can take a look at the relationship A and C have to B. (A is one step down from B. C is one step up from B.)

The notes we have discussed so far, middle C, D, E, F, G, A, B, and C are going to be the most important notes that you will be using right at first. We call these 8 notes in a row an octave. Get to know these notes. Memorize them. Make them your friends and know them well.
For my favorite app of knowing the notes well, you can check out the Note Rush App for less than $5. Choose the level that will just use treble clef for now. It will make you play the note on the piano to match the one they show you. I have found it to be a very effective app for learning notes.
After you have these 8 notes down well, you can play the right hand of the whole song of “I Am a Child of God”.
You will eventually want to know all the notes in your flashcards that you have downloaded. So don’t forget about the last four higher notes of D, E, F, and G.
Step #4: Learn left hand basic chords
There are multiple ways we can go about learning the left hand. You can, potentially learn the left hand notes (the bass clef) the exact same way you learned the right hand. If you would like the flashcards for the left hand notes from theperfectstartforpiano.com, then click that link.
I want to give you a shortcut. It will be easier and you will be able to play right away if you learn and memorize these chords. I seriously can’t tell you how excited I am to be able to share this with you. This will rock your world — it will turn these hymns into something you can learn quickly and learn well!
Follow these steps to play the hymns with chords.
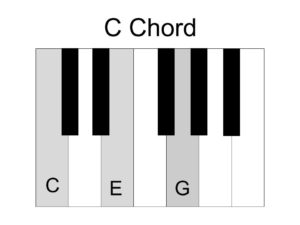
Pull out your basic chord flashcards. Let’s compare C chords.

When there is an “m” after the name of the chord, it stands for “minor”. So the way to say the “Cm chord” is to say “C minor chord”.
You will notice that there is very little difference between the C chord and the Cm chord. The only difference is that the middle note moves down to the very next key — whether that be a black key or a white key.
The proper way to play these chords is with your left hand fingers 1, 3, and 5.
Take these chords and get to know them thoroughly. Notice the patterns between them and it will make it easier to play and memorize.
As you are getting to know them, note that major chords (or the chords that just have one letter) have a pattern of 4 keys then 3 keys. The minor chords have the opposite pattern of 3 keys then 4 keys.
To make sure you know what I mean, on the C chord, start on C. Count up 4 keys and you will find the next note – E. Count up 3 keys and you will find the note G.
On the Cm chord, start on C. Count up 3 keys and you will find Eb. Count up 4 keys from there and you will find G.
Congratulations! Getting this far is an achievement! You have all that you need to begin playing the hymns in Hymns Made Easy. Let’s see how you do!
Let’s start out with “I Am a Child of God”. You already know how to play the right hand. Let’s talk about the left hand. Notice all of the letters above the lines? There is C, then F, then C, etc. Those letters represent the chords we just learned.

Now you can completely ignore everything except the treble clef and the chords you find above it.

At this point, you know all you need to know to play. Play the right hand at the same time you play the chords with the left hand. Hold the chords down in your left hand until a new chord needs to be played. Try out this first line and see how it goes!
When you are ready for the 2nd line, then note that anytime you see a 7 after the chord, just play the chord as if the 7 wasn’t there. For example, instead of playing A7, Dm, D7, and G for line 2 in “I Am a Child of God”, play A, Dm, D, and G.
Go ahead and finish off the song! If your hands start running into each other, then always keep your right hand where its at and adjust the left hand — moving up and down the octaves as needed to make space for both hands.
You did it! You played your first hymn! Only a few more things to learn and you can play any hymn you want. You are down hill from here. You’ve learned the toughest steps so far. Just a few things to go.
Step #5: Learn note rhythms: eighth, quarter, half, dotted half & whole
Up to this point, you have learned all the notes, but you don’t quite know the names of the specific type of notes or why they are even there.
There are five different kinds of notes you need to know: eighth, quarter, half, dotted half & whole notes. These five notes will tell you how long to hold the notes.
Grab your rhythm flashcards. Study these notes and you will find all you need to know about how long to hold those notes.
At the beginning of every song, there are two numbers stacked right on top of each other.
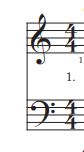
These numbers are called time signatures. The top number tells you how many beats to count per measure. If the bottom number is 4, it tells you that a quarter note gets one count. So, for this song, each measure will have 4 counts.
As you play the notes, count them out for as long as they are worth up to 4. Then start over for the next measure.
If we take the first line in this song, then we would count like so:

Timing can take some practice, but keep at it. It’s worth it! Just make sure to keep a steady beat — just like a clock ticking on the wall.
You almost have it! Just one more small detail and you will know all you need to know to play every hymn in this book! Then you can move onto your other hymns as you continue to progress.
Step #6: Learn key signatures C, G, F, & Bb
Key signatures mean something very simple. At the beginning of every song, it will tell you something very important. It may have sharps or flats there. If they do, then that’s super important to watch for! In Hymns Made Easy, there are only four key signatures, so let’s look at them all.
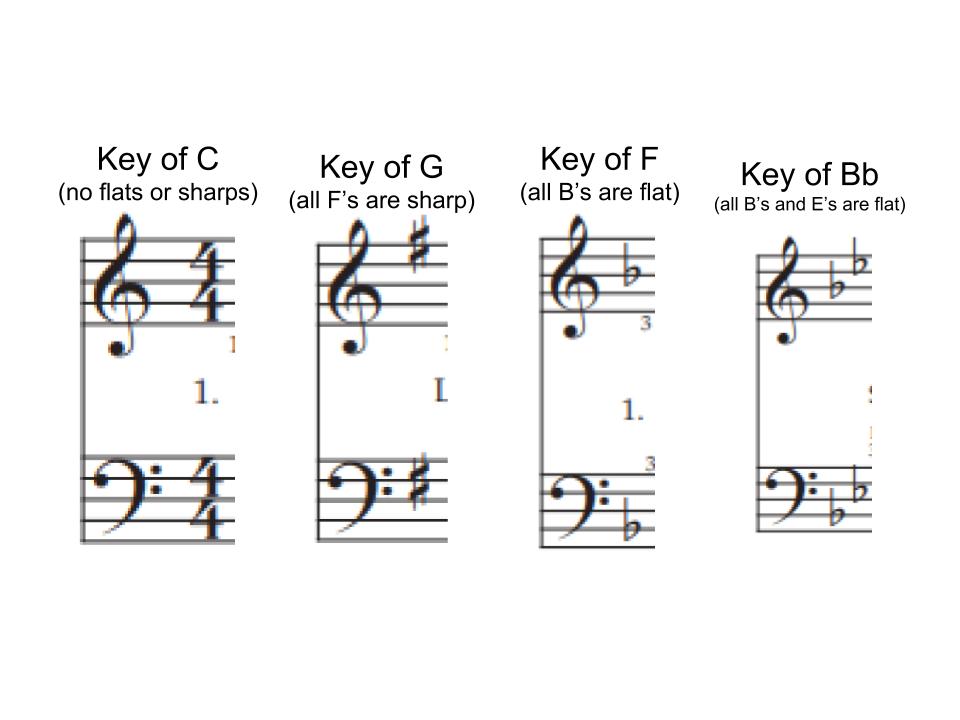
A sharp is one key above. A flat is one key below. All you need to know are these notes for all of the key signatures.
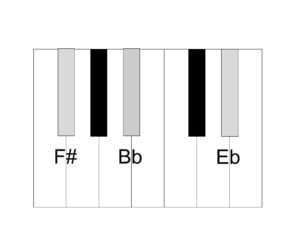
Every time you play a song, watch for the key signature because you will need to make sure that all of the proper notes are flat or sharp, depending on the key signature.
Step #7: Practice and play!
You can now play every song in the Hymns Made Easy! A couple things to note:
- If you find a chord that you don’t know, don’t play it. It will sound fine without it.
- Remember to play every 7 chord as just a normal chord.
- If there are more than one notes in the right hand, just play the top note.
- Remember to watch for the key signatures!
- Listen with your ears for if it sounds right. If it doesn’t, look really closely — you are probably off on your notes or your timing, or your key signature. Listening with your ears will be your greatest key to success!
- If you would like to know the best way to practice, check out my article here.
If you find yourself ready to move on to harder things, then learn all of the notes in the bass clef. Try playing the songs that way. When you have mastered that, add in all of the notes — even if there are more than one notes put together in the right hand.
For a list of the hymns from easy to medium, to harder, then take a look at page 87 of Hymns Made Easy. It will group them according to ease of performance.
If you are ready for more after that, then take on some of the hymns from the hymnal that you are familiar with. With practice, you can accomplish anything!
Related Questions:
Easy piano hymns for beginners: Nearer My God to Thee; Choose the Right; Sweet Hour of Prayer; God Speed the Right; Come Follow Me; God Be with You Till We Meet Again; Sing We Now at Parting; Thy Will, O Lord, Be Done; Do What is Right.
Piano hymn playing techniques:
- Play less notes in the chords of the hymn.
- Play only the first chord in each measure.
- Play the SAT with the right hand and B with the left.
- Play only the right hand top note and the left hand bottom note.

Tel loves her life as a piano player, a piano teacher, and a mom. Amid piano blogging, piano teaching, and piano playing, she loves a chance to fit in a good exercise class, volunteer at her kids’ school and at her church, and go on long dates with her husband. Full bio at About Tel.


pls how can i play hymns perfectly?
I would suggest learning one measure at at time, then line by line. Learn hands separate, then put them together when you can. Go slowly, be patient, and practice! You will get there! Good luck!
What is meant by SAT and B in ‘Play the SAT with the right hand and B with the left.’?
Got it figured out. The 4 singing voices.
Sir pls as a beginner I don’t know how to accompany left hand chords to. The right for this hymn Be glad in the lord and rejoice.
Is it the hymn made easy that has the key and their written notes on it
In the Hymns Made Easy, it shows the chord to play right above the written notes.
Can you give a keyboard as a gift, for me to learn it easy pls
Oh I wish I could! I hope you can find a way to get a piano so you can start learning!
Where I come from (Fort Portal), there are many catholic hymns composed by white fathers from France. They are sweet localized hymns but we do not have pianists and we need to preserve them for future generations. Is there anyway you can help reproduce instrumentals where someone can sing along? Can I send you short voice notes for your easy composition? Can you play them using Organ/reed voices? They are quite many. vincent.mugisa@yahoo.com
Thank you so much for your efforts, especially thank you from those like myself who have an earnest desire to play piano. May God Bless 🙏
It has increased my understanding for music and it has increase my knowledge I request for more lesson so that I can grow in my plane music