Inevitably, every student of the piano will learn about, or at the very least hear about the importance of practicing your scales. No matter if you are a beginner or an advanced pianist, you will be practicing (and continuing to master) your scales.
How do you go about practicing your piano scales? What steps do you need to take to make sure that you gain this important skill? Let’s take a look at how to practice your scales, why you want to, and some expert tips to ensure your success in mastering them.

1. Learn one scale at a time.
The first step to practicing your scales is to learn your scales, one a time. Luckily, it actually isn’t very difficult to learn each scale because each scale has the same exact pattern.
Each scale consists of whole and half steps. A half step consists of one key to the next key on the piano, or one tone to the next tone. Since two halves make a whole, a whole step is simply 2 half steps. Thus a major scale has the following pattern.
Major Scale Pattern: whole step – whole step – half step – whole step – whole step – whole step – half step
also written as W-W-H-W-W-W-H
Often times, beginner pianists will learn all the major scales in order of number of sharps or flats. Since the C scale has no flats or sharps at all, it often becomes the first scale that’s learned. Using the pattern we used before, we can discern what the C scale is by using half and whole steps.
The C scale is C – D – E – F – G – A – B – C.
As you can see, we begin in the intended scale, which in this case is C and we end on C. So each scale consists of 8 notes.
From the C scale, it is often easier to think of the different scales and figure them out in order of sharps or flats. When I teach my younger students, I begin with the C scale and then work up to 1 flat, then 1 sharp.
Then often times we work on minor scales in conjunction with the major scales according to the amount of flats or sharps that are in each scale. So, to learn the minor scale pattern, we also use whole steps and half steps in the exact same pattern every time.
Minor Scale Pattern: whole step – half step – whole step – whole step – half step – whole step – whole step
also written as W-H-W-W-H-W-W
This would typically be the order of how I teach scales to my students and a goal of what scales every student should know:
- C major scale (no flats or sharps)
- A minor scale (no flats or sharps)
- F major scale (1 flat)
- D minor scale (1 flat)
- G major scale (1 sharp)
- E minor scale (1 sharp)
- Bb major scale (2 flat)
- G minor scale (2 flats)
- D scale (2 sharps)
- B minor scale (2 sharps)
- Eb major scale (3 flats)
- C minor scale (3 flats)
- A scale (3 sharps)
- F# minor scale (3 sharps)
- Ab major scale (4 flats)
- F minor scale (4 flats)
- E scale (4 sharps)
- C# minor scale (4 sharps)
- Db major scale (5 sharps)
- Bb minor scale (5 sharps)
- B or Cb major scale (5 sharps or 7 flats)
- G# minor scale (5 sharps or 7 flats)
- Gb or F# major scale (6 flats or 6 sharps)
- Eb or D# minor scale (6 flats or 6 sharps)
You can see the pattern of learning in increasing number of sharps or flats, first teaching the major scale followed by the relative minor.
You can also master the harmonic minor and melodic minor scales. Harmonic and melodic minors have different scale patterns than the ones we have learned so far.
2. Learn correct fingering for each scale.
Of course, you first need to learn the scale which is why that was step #1. But you absolutely MUST learn the correct fingering for each and every scale. This is really important. As you practice, take care that your fingering is absolutely correct for each scale.
As a review, the finger numbers are as follows:
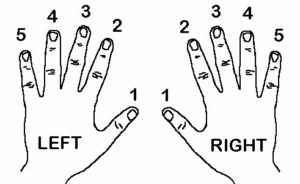
Here are some general rules of fingering (courtesy of Robert Kelley, Ph.D) :
Fingering Rule #1 Fingering patterns alternate 1-2-3 — 1-2-3-4, or the opposite of 4-3-2-1 — 3-2-1.
This pattern shows that obviously there needs to be some tucking under or crossing over in order to achieve these scales! You tuck the thumb under when ducking under the 3rd finger. You cross your 4th finger over.
* Tuck the 3rd finger, cross over with the 4th finger. *
You will want to do this as smoothly as possible when you are tucking or crossing over.
Fingering Rule #2 Never play your thumb on a black key.
Fingering Rule #3 The fourth finger should always land on a black key (except for the scales that have no black keys played).
Fingering Rule #4 The fifth finger should only be played when starting, stopping, or reversing your scales.
You can find the major scale fingerings at pianoscales.org as well as fingerings for minor scales, blue scales, jazz, and other scales in the menu on the left hand side.
3. Learn proper technique to prevent injury and increase effectiveness in your scales.
Now that you know about the tucking and the crossing over that becomes absolutely imperative to playing your scales, you understand just how important your technique is! Proper technique will help prevent injury and help you to prevent sloppiness in your playing scales.
When you play your scales, use curved fingers and a loose wrist. When pushing down your keys, you should be using the weight of your body, not just your fingers. Using your body weight and leaning into the scales will help you to achieve more power. It is an excellent time to start learning this technique as you practice your scales.
Allow your wrist to move with your fingers as you tuck your thumb under or whenever you are crossing your third or fourth finger over the top of your wrist. A nice, light wrist is important. You can flip your fingers over as you are crossing over. Do so quickly. This will help you as you build up speed when you get more practiced.
Keep your forearms relaxed. Avoid them getting too tight. Treat this as you would any exercise. You have to build up the endurance and the strength. You can’t expect to have crazy strength and agility at the beginning of an exercise program, just like you can’t expect too much from your scale practice until you build up to it.
4. Practice slowly and correctly from the very beginning.
When you begin practicing your scales, do so very, very meticulously. Check your hand position and form. Make sure that your finger numbers are absolutely correct — from the very very first time you play it. The scales become muscle memory and thus it is super important that you are putting the right memories into your brain.
Practice slowly and correctly. You don’t have to worry too much about timing until you make sure you get each scale down 100% accurate. This is a time that you need to be sure that you are 100% accurate. No making mistakes. See how many times you can play it through without messing up a single time.
5. Practice scales in a parallel and contrary motion.
When you begin practicing scales, you can try doing contrary motion first. This is when both finger #1 on the right hand and the left hand start on the beginning key and then follow the exact same fingering as you go out. Try doing one octave of contrary motion with both hands.
For example, for the C scale, you will begin both of the thumbs on middle C. Then use finger numbers 2 – 3 – 1 – 2 – 3 – 4 – 5. Your hands will move away from each other and end on bass C and treble C. Then you can come back using fingers 5 – 4 – 3 – 2 – 1 and ending on middle C.
You can then move to contrary motion. Begin this hands separate. Learn the left hand and conquer it until you can do it with your eyes closed. Make sure you can do the same with your right hand. Once you are confident you have it, finally try to put both hands together. Slowly work through this and be accurate – just as we discussed before.
6. Practice with a metronome.
Once you are comfortable with the fingering and positioning of the hands, you will want to make sure that you are practicing with a metronome or a beat. Scales are definitely an exercise that requires precise timing and precision — and the only way to achieve that is with a metronome.
Start at a slow speed and seek for 100% accuracy without compromising your form or technique. You can begin to pick up your speed as you master the scales.
7. Practice scales in one octave then progress to multiple octaves.
One of the major reasons you are learning scales is to become comfortable with key signatures and to help you adapt that to your piano playing so that you can navigate new keys. As such, become very familiar with the scale you are working on with just one octave at at time.
You will want to do it in one octave and then move to two octaves because your fingering has a new twist when you begin adding octaves. Instead of ending on finger #5, you flip back to finger number one.
After you have mastered the scale in one octave, you can move to multiple octaves. Once you can do two octaves, you can move to as many octaves as you would like.
Before long, you will be scaling the whole keyboard!
You will begin to notice the use of scales in your repertoire, if you haven’t already. Songs move and flow between the scales, and pattern after them. So as you use these scales, learn them, and master them, it will help aid you in your journey of piano playing!
8. Increase speed progressively when practicing scales.
As you use the metronome and begin to scale in multiple octaves, you can increase your speed progressively. Begin slowly, as mentioned before, but then increase your speed slowly.
Your muscles will develop, your endurance will increase, and you will find yourself being able to push your limits more and more. You will find that your muscle memory comes in handy when you are practicing your scales at faster and faster speeds. Your fingers will begin to move faster than you can think and that’s okay!
If you have put in the effort to learn it correctly, you will begin to rely upon that muscle memory to take you into higher speeds. Continue to use the metronome. Continue to do a little at a time, building up your endurance, your accuracy, and your speed. You will surprise yourself at what you can accomplish!
Why should we practice scales?
Increases finger dexterity. Each of your hand muscles are trained and strengthened as you practice your scales. You can learn finger independence and dexterity. Using your fingering and mastering the fingering of each scale will come in handy as you expand your repertoire.
You will find the scale pattern in songs and that will help you to navigate through those as you learn.
Builds muscle memory. The fingers will become trained in ways that you won’t have to think about anymore.
Helps you master key signatures. The awesome thing about building muscle memory is that you will then be able to learn new songs in key signatures for which you are learning the scales. You learn the building blocks to those songs, and you can then begin to function within the key signatures in those songs without having to think too much about it.

Tips for Practicing Scales
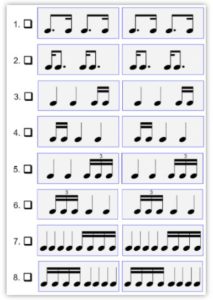
Practice in different rhythms and/or accents on different keys. As you practice the scales, try changing up the rhythm and the accents.
- Play a long short pattern. Then switch it up and play a short long pattern.
- Accent every other key. Then accent every third key. Then accent every fourth key. Continue to find new keys to accent.
- Piano Marvel suggests some different rhythms to practice in your scales:
Practice chromatically.
Once you have learned the scales, try practicing chromatically. Begin on C, then move to C#, then D, etc. This will help test you to make sure that you really know your keys independent of the number of sharps or flats. This will test your abilities, but if you have truly put in the effort to master them, you may surprise yourself at your success in doing it!
A Useful Online Tool to Practice Scales
I have recently been exploring Piano Marvel and have found a fantastic tool for mastering your scales. You can even try it for free to see how you like it before you commit to purchasing anything. They have a program called Scale Ninja in which you learn how to master your scales, then learn how to increase your speed. You can become a pro as you work through their program.
If you are interested, you can sign up for Piano Marvel by clicking on this Piano Marvel link. Then proceed to creating a free account, no strings attached. Then when you are in the program, navigate to the Library where you can then search for “Scale Ninja”. As you begin to master the scales, you will automatically be able to see how you rank and at what level you are! I wouldn’t suggest it unless I knew it was a great program to try out!

Tel loves her life as a piano player, a piano teacher, and a mom. Amid piano blogging, piano teaching, and piano playing, she loves a chance to fit in a good exercise class, volunteer at her kids’ school and at her church, and go on long dates with her husband. Full bio at About Tel.


Very helpful tips, thank you. My daughter just started lessons and just started practicing a scale — this list will help me guide her practice!