I have recently been trying to figure out the best option for teaching piano lessons in the summer. With all the traveling and busy schedules, it is very difficult to keep up consistent piano lessons! So, I decided to create a summer music camp for my students.
This is my awesome free summer music camp lesson plan. My objectives for this summer camp lesson plan is to first of all – have fun with music! And also to learn and review notes and rhythm, inspire students to create their own musical rhythms and to put them together to create and perform their own percussion ensemble. This lesson plan includes a list of costs, materials needed, a checklist for preparation, activities, lessons, and worksheets.
This lesson plan will allow you to have all the pre-planning done. All you need to do is to know the lesson plan, prepare the materials, and invite the students!

Summer Music Camp Lesson Plan
Summer is a time for fun, and music camp should definitely be fun! I am planning for this music camp to be a one day, three hour camp for beginning to intermediate students. I want it to be able to have this work for anyone who already has some music background, or no musical background at all.
This is the outline for this 3 hour summer music camp:
- Introduction game – Four Corners (15 minutes)
- Make a musical instrument (15 minutes)
- Presentation on music notes (30 minutes)
- Break (10 minutes)
- Reinforce the presentation with a game — Music Note Twister (15 minutes)
- Assess and reinforce understanding with a worksheet (10 minutes)
- Students create a series of rhythms to use with the percussion ensemble (15 minutes)
- Break (10 minutes)
- Combine rhythms to create a percussion ensemble and practice (30 minutes)
- Rhythm bingo game (15 minutes)
- Perform percussion ensemble for parents (last 15 minutes)
Cost:

The cost of the materials will be about $12/student if you have 10 students.
- 12 pack of drumsticks
- 10 pack of buckets
- Variety of 25 rolls of duct tape
- Copies made and pencils: roughly $5
- Refreshments/snacks for breaks: $22
Thus, with the time and preparation needed for this camp, I would suggest charging $35/student for your one day summer camp. You would make a profit of $230. Of course, you can have more than one group of students! You would need to order more materials, but your prep work would be done anyhow!
Materials Needed:
- Lesson plan printed out for reference
- Pair of drumsticks per student (click here for an option of buying in bulk)
- A bucket per student (click here for an option of buying in bulk)
- Colorful duct tape (there are a fun variety of colors and options found here)
- Scissors for cutting duct tape
- Chairs or stools for students
- Music Note Twister cards (at least 3 copies of this doc)
- Dice
- 10 Pencils
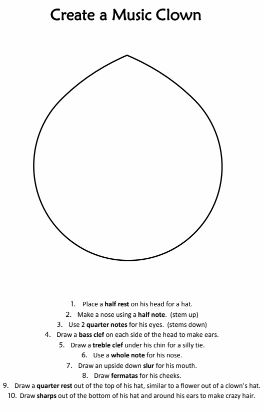
- 10 copies of Create a Music Clown Worksheet
- A way to display the “cheat sheet” music note rhythm guide
- Bingo rhythm game cards printed and cut out
- Markers for bingo game
- Paper for writing rhythm pieces
Preparation Checklist:
- Buy or order materials
- Make copies of Make a Clown worksheets, bingo cards, and blank staff papers
- Print out at least 3 copies and laminate (optional) Music Note Twister cards
- Purchase snacks (ideas include: fruit, granola bars, popcorn, veggies, cookies, popsicles, ice cream bars, drinks, etc.)
- Set the date, invite, and advertise!
- Don’t forget to include date, beginning and end time, time that the parents should come to watch the ensemble, cost, location, and a brief description of the camp so they know what to expect
Full Summer Camp Lesson Plan:
1. Introduction game – Four Corners (15 minutes)
Begin your camp with a game. This is a good way to break the ice with you and your students. You want them to get comfortable with you and with each other and to find things in common with each other. The point of this game is to find commonalities and differences and to laugh a little too.
Four Corners
Each corner will represent an answer to the question that you have for them. Ask the question, then let them go to the corner in which they would give their answer.
Question #1: What’s your name? If you know everyone’s name in here, go to corner #1. If you know some of the people here, go to corner #2. If you don’t know anybody’s name at all, go to corner #3.
After they each go to their corner, take the opportunity to let corner #1 tell everyone’s name in the room. If there is nobody in corner #1, then ask corner #2 to tell the people’s names that they do know. If there are only people in corner #3, then go around and tell everyone’s name.
After everyone’s names are revealed, ask the question again. Do this for a couple more times until it seems that people are getting names down a little better.
Question #2: How are you feeling right now? If you are feeling excited to be here, go to corner #1. If you are nervous to be here, go to corner #2. If you are tired, go to corner #3. If you are hungry, go to corner #4.
Question #3: How much do you know about music? If you can read music, go to corner #1. If you know a few things about music but not a lot, go to corner #2. If you like to sing to the radio, but that’s about all you know about music, go to corner #3. If you hate music, go to corner #4.
Question #4: What is your favorite season? Corner #1 – Spring. Corner #2 – Summer. Corner #3 – Fall. Corner #4 – Winter.
When they all get in their corners, have them turn to their fellow students and share what their favorite thing is about that season.
Question #5: What is your favorite meal? Corner #1 – Breakfast. Corner #2 – Lunch. Corner #3 – Dinner. Corner #4 – Snack time.
When they are in their corners, have them share with their fellow students what is their favorite item to eat in that meal.
Question #6: If you could go on vacation, where would it be? Corner #1 – The mountains. Corner #2 – The beach. Corner #3 – The big city. Corner #4 – The desert.
Question #7: Which would you rather? Corner #1 – watch a movie. Corner #2 – read a book. Corner #3 – play a video game. Corner #4 – play a board game.
Question #8: Which are you most looking forward to? Corner #1 – your birthday. Corner #2 – Christmas Corner #3 – Fourth of July. Corner #4 – Thanksgiving.
Share what their favorite thing about that holiday is with their fellow students.
Question #9: What’s your favorite type of music? Corner #1 – classical. Corner #2 – pop music. Corner #3 – jazz or blues. Corner #4 – country or folk music
Share what their favorite song in that genre is right now.
2. Make a musical instrument (15 minutes)
Distribute the buckets, the duct tape, and the scissors. This is the time for them to decorate their bucket however they wish. Use the duct tape to make designs, or spell things or shapes. Let them at it!
When they have completed their designs, they can set it aside for now.
3. Presentation on music notes (30 minutes)
Begin your lesson with this demonstration you can find here. Summarizing this post, the suggestion is to take a “whole” piece of paper to represent a whole note worth 4 counts. Fold it in half and cut it. This creates a half note, worth 2 counts, because 2 + 2 = 4. Cut these half note pieces in half again, and it will create 4 quarter notes worth 1 count each. Cut the quarter notes in half again and it create 8 eighth notes, worth 1/2 count each. If we were to cut it again, it would create 16 sixteenth notes, worth 1/4 count each. It may be helpful to print out the pictures with the names on each note found on the link with the demonstration. Or, you can use the music note twister cards to show the notes as you demonstrate.
Make sure to have pages ready to cut to demonstrate the note value, just as is shown in that post. As you cut each paper to demonstrate the note name and value, give blank paper and scissors to the student to do the same.
Review the note names and quiz the students to see if they can remember the note names and how much they are worth.
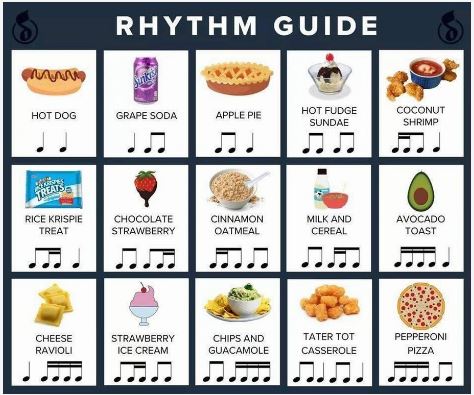
If this is seeming difficult to the students, then tell them that since they are on summer break, then you will cut the some slack and make it a little easier on them. They can “cheat” and use this rhythm guide found here, which uses food items to display rhythm patterns to figure out the timing on these more complicated rhythms. This is fun stuff! Can’t wait to see the kids reactions as they put these rhythms together.
4. Break (10 minutes)
Allow them to take a break and eat some snacks. Let them mingle and just relax for a little bit. Restroom break.
5. Reinforce the presentation with a game — Music Note Twister (15 minutes)

Spread out the music note twister cards all over the floor. Roll a die. Whatever number is picked, they need to touch notes on the floor to add up to that number. For example, if a 2 is rolled, they can step on a half note, or 2 quarter notes, or 1 quarter note and 2 eighth notes, etc.
After playing the game in that style for about 5 minutes, then tell the students to pick up the cards according to the number you roll and they need to create a rhythm that totals up to that number. For example, if you roll a 4, then they need to pick up cards to create a measure that has 4 beats in it. That could be four quarter notes. Or a quarter, 2 eighths, and a half note. After they create their measure, then have them each present their measure and clap it out for the rest of the class.
Repeat these exercises until your time is up.
6. Assess and reinforce understanding with a worksheet (10 minutes)

Give each student a Create a Music Clown worksheet. Allow the students to fill out the worksheet as best they can. If they can’t fill out certain items because they simply don’t know all the answers, then you can help each student as needed. Or better yet, have the students that do know the answers, teach the students that don’t. It would be a fun time to give a quick lesson on what each symbol is, if needed.
7. Students create a series of rhythms to use with the percussion ensemble we will create (15 minutes)
Remind the students of when we chose a number and they created a rhythm that the notes equaled that number in the Music Note Twister. Now, it is their opportunity to create a line of rhythm for 5 measures in a 4/4 time signature. They can create it however they want, but they need to be able to clap it out and understand it. Give them a blank staff paper to be able to write their rhythms down.
They can use the “cheat sheet” food rhythm guide to put together the rhythms, if they so desire. Do encourage them to write down the notes as well as the food items underneath. The more practice they can get writing the notes themselves, the better.
When they have finished and are able to clap out their rhythms to you, then they can practice their rhythms on the drum they created. I would suggest having them all do this either all at once or one at time. It would not work well to have someone tapping out on the drum while the other is trying to think.
8. Break (10 minutes)
Snack and chat!
9. Combine rhythms to create a percussion ensemble and practice (30 minutes)
Now, it is time for everyone to perform their rhythms to the class. Have each one present their rhythm, on their buckets.
After all 10 students have performed their piece, let the kids put together a 4-5 minute show that they will present to their parents. It has to be something that they can come up, perform, and have ready to go by the time the parents come.
If you want, or find the need, to coach them on what they come up, then check out this video of 5th graders, performing a percussion ensemble. It has some good ideas of how to begin the show, and some fun ways to do some rhythms that are together, or that mimic other popular songs.
This lesson plan is designed that if you need extra time, go ahead and forgo the rhythm game and use up that time as needed.
10. Rhythm bingo game (15 minutes)
Clap out a rhythm (one that is found on their game boards). They must match the rhythm to the spot on the board and place a marker on it. If a person wins a bingo, they get to be the one to clap out rhythms as their fellow students place markers on the board.
11. Perform percussion ensemble for parents (last 15 minutes)
At this time, parents should be arriving. Gather the students and the instruments together and prepare to perform the work that they created together. Thank the parents for coming. Thank the students for their hard work, and let the performance begin!
Make sure you film this! It will be good to post on YouTube so that the families can have access to it afterwards.
Printable Format
If you would like a copy of this lesson plan in a printable format, click here.
Good luck!
I hope that this is helpful for you in planning your summer music camp! I hope that it is fun, educational, and a great experience for you and your students.
Tel loves her life as a piano player, a piano teacher, and a mom. Amid piano blogging, piano teaching, and piano playing, she loves a chance to fit in a good exercise class, volunteer at her kids’ school and at her church, and go on long dates with her husband. Full bio at About Tel.


